Sunday, December 6, 2015

Furlex part 5 The foils, extrusions and sails


 We talked about the foils a bit earlier in the videos but just to review, make sure they are strait and not kinked and here is why, to disassemble this foil with the spring clips,
1 remove the cable as instructed in part 1 and 2
2 now lay your assembled foil on a long flat surface
3 take a wood dowel or soft rod and place it in the end of the foil (either side) against the black plastic insert that held your cable and strike it with a good hammer, you may have to soak the connections with LPS or WD Blaster.
4 If you have kinks in the joint of each section this part is going to be difficult to do, if not the rod will drive all the inserts forward at the same time and all will fall apart as one unit.
mark them clean them up and store all parts in a Ziploc bag.

To reassemble all that you just did is done in reverse with the cable installed, this will come later.

In an earlier post I explained how to measure your new head stay with the furler drum attached . You then followed the instructions to determine the overall length of the extrusions and cut the top one to length. Good Job ,Well done
Take the parts and lay them out in the yard and just temporally assemble them.

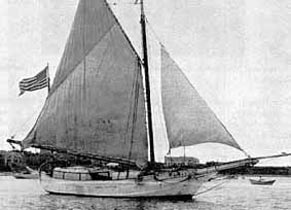
Next we are going to measure the head sail.

If you have the old one that came on the furler,
 it will have to be recut down to size, in doing so you will loose size from the foot and luff .
Position your foot


note how much longer the head is now

this will have to be cut back

I would recomend taking your sail at this point to a sailshop and have it evaluated for how much size you are going to loose with this mod and what your cost is going to be.
also if the sail is even worth the modification.

I took a 1.5 hr roadtrip to www.vtsailing.com    Vermont sailing partners 
 for an evaluation of my headsail and it didnt take long to determine that this sail was not servicable any more.
The problem was when the sail was stored it was wound on the furler backwords thus exposing the sail to the elements and the cove was well prserved on the wrong side ,so the sail is a loss.

If youplan to use your old hankon furler 

The same applies as above in addition you will have to have the hanks cut off the fut and replaced with luff tape, any sailshop will do this for you at a reasonable cost asuming the sail is the right length if not it will also have to be cut down and you loose size again.
Some sailors are handy enough with a sewing machine to do this yourself and a good scource for this is Sailrite .com   http://www.sailrite.com/. again this can become a cost issue as it was with me.


My option and #3 is to shop on Ebay ther are many sails there up for sale ,just make sure you know exactly what size you need ,foot ,luff and leach and start shopping.
Thats how I found mine for under $200.00 dollars ,much cheaper than having the old ones modified .

In our next post we will see what i bought and also show you how to sew up that old faverate hank-on and make an inner stay jib out of it.


Saturday, October 31, 2015

Furlex part 4

Here are some additional short clips to help you better understand how the assembly went together


Furlex part 3

Well now you have the cable out and the cone is not damaged ,right. Otherwise its going to cost you more money

The swivel unit consist of an upper and lower bearing race.with 4 half housings
This part will require some duct tape and a place to assemble without loosing any of the 68 ball bearings that you have in your zip lock bag when you took the thing apart and it fell all over the place.
Work in an area where you can recover these bearings easily when you drop them, and you will.
There are 34 ball bearings for each assembly.
take the lower and upper race and tape them together lightly ,
Do NOT wrap the tape around the housing at all just make sure both ends just come together
Now from the top drop each ball into its race, when done put hand pressure on the top race and slowly remove the duct tape, holding both halves securely place the housing on to the lower bearing assembly and drop the swivel unit on top.DO NOT play with it leave it alone Or you will be starting all over again.
assemble the upper bearing in the same manner. Dont attempt to try and place the ball bearings into the upper unit by themselves , while it may look tempting you will not get the upper cone on and some of the bearings will fall into the assembly and then you have st start all over again with both the upper and the lower units
Use the duct tape sparingly put a bit of pressure on the assembly when you pull the tape off and all should be fine.

Now slip the locking cone over the top, Dont forget the two nuts that hold the countersink screws in place.

The sandpaper collar did not work but it was a nice try

This should complete the assembly of the lower unit which is now ready to accept the new cable and the aluminum extrusions.
We will talk about those in part 4

Furlex part 2

The Halyard swivel at the top required no work at all, just some light cleaning with PB Blaster and lubrication, with very light sewing machine oil.

Removing the extrusion from the Lower bearing assembly was not easy and took about an hour and a fair amount of heat and prying.

Once out the cone got cleaned up and ready to be but back in service
The left over cable was then removed , all threads and fittings cleaned and refitted
now you can remove the cable that was cut off


An old Furlex that i bought

In this series we are going to address the disassemble y , rebuild and installation of a 1989 type a furlex system that i got real cheap off an old mast.

The unit is heavy with ss bearings and BIG .
First do not bend the extrusions, if one or two are already bent avoid any further damage by placing the entire unit on a flat surface. This unit as with all furlers they where not designed to be disassembled , so follow my steps and avoid my mistakes and you will be fine.
Measure your head-stay and determine how long it has to be. If the used furler is at least 2 to 3 feet longer your in luck, if its any shorter you will need to buy a new head-stay cable. as you will see later as the project progresses
The top of the stay with the trim removed


 A strait section
 A bent section
 this is margenal
 the old luff tape opening.this part is of different dimension as you will see as we go on
The business end ,totally disassembled with the cable exposed
If you have this piece in your hand you will also have an entire large zip-lock bag full of small parts the you did not loose during dis assembly
If you can get in there cut the exposed cable as you will not be able to get the cone out of the end of the unit with everything attached. Dont try ,you will cause more damage
If you cant get a clean cut , cut at the end of the extrusion to separate. In doing so you will destroy a locking pin and part of the lower extrusion insert. This is why its important that you have that extra 3 feet to work with, you can then reuse the same cable.
The cable must be cut in order for you to separate the foil sections . Yes they have to be separated or else you will have a very difficult time during reassembly. This unit comes apart as a single function as you will see later.
Once you have gone this far remove the short piece of cable from the housing without damaging the end.
All this will be explaind step by step as we continue with the details of this project in part 2


Sunday, October 28, 2012

Friday, May 11, 2012

2012 is on the way

On our boat we have the new mainsail up, new track and traveler system, upholstery cushions with memory foam, fresh batteries, the old ones where 4 years old. A new alternator and belt drive and some long needed hull cleaning. The only thing left is a good deck cleaning. We are ready to go.Most of this was done last month and throughout the winter. I will post videos and pics shortly